
Grout Refurbishing
If the spaces in between the tiles in your bathroom and shower are dirty or unsightly, you can do a quick grout repair job on the seams to make them look new again. Cleaning up and repairing grouted seams in tiles is an easy DIY job, and you can usually complete the job in a couple of hours. This easy to follow how-to guide will walk you through the entire process.
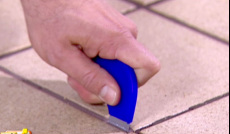
Step 1 - Remove Loose and Damaged Grout
After you purchase the grout with the type that matches the color of the grout currently used in your bathroom. Use a grout saw to remove the loose or damaged grout in between the tiles. Gently run the grout saw back and forth along the grout seams. Be careful, to make sure you don't damage the tiles.
Step 2 - Clean the Seams
Use a spray bottle and some cold water to wet the areas where you removed the grout. Then, take an old toothbrush and scrub out the seams. This will remove the grout you freed with the grout saw. Finally, wipe away excess water or grout with an old towel or rag.
Step 3 - Mix the Tile Grout
Refer to the instructions on the bag or box of tile grout you purchased. Follow the directions precisely when mixing the grout. You can mix the grout in an old plastic container or something that you can dispose of later.
Step 4 - Spread Grout
Use the grout float to fill the seams. Try to fill them completely, making sure the grout is as level and straight as possible. Use small edge of the grout float to match the beveled grout surface used on the other tiles.
Step 5 - Clean the Tiles
Working in small sections, clean the tiles with a sponge to remove any excess grout as you go. If you wait too long to clean the tiles, the grout will dry and be harder to remove. If the grout does dry and become hard, use a putty knife or plastic scraper to scrape the grout away. Then, use a damp rag to wipe the loose grout and residue way from the tiles and seams. Allow the tiles to dry before continuing.
Step 6 - Polish Tiles
Once the tiles have dried, take a soft towel or an old T-shirt to buff out the tiles where the grout was applied. Sometimes, the grout will cause the tiles to lose their luster or shine. If you buff the area for a few seconds with a dry cloth, the shine on the tiles should return.
To understand further or purchase any material, please get in touch here:
