
How to use Cement Tile Grouts
Step 1: Surface Preparation
Before starting to grout remove spacers and debris in grout joints and remove dust and dirt using a wet sponge. Do not leave water standing in joints. Room temperature must be between 40 ° F(4° C) and 90° F(32° C). Apply grout release or sealer if necessary.
Step 2: Mixing
Place grout admix as per recommendation of grout company into a container and add grout powder slowly. Mix by hand or with a slow speed mixer to a smooth stiff consistency. Allow to slake for 5-10 minutes and remix.
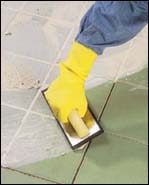
Step 3: Application
Dampen tile surface with water. Spread with a sharp, firm rubber grout float. Work the grout paste into the joints until completely filled. Use diagonal strokes to pack the joints. nsure that joint is filled and grout is not just sitting on top (i.e. “bridging the joint”).
Before starting to grout remove spacers and debris in grout joints and remove dust and dirt using a wet sponge. Do not leave water standing in joints. Room temperature must be between 40 ° F(4° C) and 90° F(32° C). Apply grout release or sealer if necessary.
Step 2: Mixing
Place grout admix as per recommendation of grout company into a container and add grout powder slowly. Mix by hand or with a slow speed mixer to a smooth stiff consistency. Allow to slake for 5-10 minutes and remix.
Step 3: Application
Dampen tile surface with water. Spread with a sharp, firm rubber grout float. Work the grout paste into the joints until completely filled. Use diagonal strokes to pack the joints. nsure that joint is filled and grout is not just sitting on top (i.e. “bridging the joint”).
Step 4: Cleaning
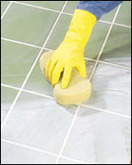
Grout Primary Cleaning - Remove excess grout from the face of the tiles with the edge of the grout float. Hold the float at a 90° angle and pull it at a 45 ° angle diagonally across the joints and tile to avoid pulling out the material.
Grout Secondary Cleaning - Remove remaining grout with a damp sponge (not wet) or a damp towel. Work diagonally to the joints. Allow to dry. When the grout joints are firm polish the surface with a coarse nylon pad or coarse cloth and minimal water.
Note: Use caution when polishing soft glazed tiles or polished stone.
For more details download Datasheets here
For any further enquiry regarding Tile Grouts and cleaners - CONTACT US
